Tools Palatte -- there are 30 different tools to choose from.
 this is equivalent to the "freehand" setting in Paintbbs. this is equivalent to the "freehand" setting in Paintbbs.
 this is the line tool. click and drag to create straight lines. this is the line tool. click and drag to create straight lines.
![rectangle tool src=]() this will create a rectangle; again, click and drag from a corner to how large you want it to be. this will create a rectangle; again, click and drag from a corner to how large you want it to be.
 this will create a circle, just like the rectangle tool. this will create a circle, just like the rectangle tool.
 this will create a filled rectangle. this will create a filled rectangle.
 this will create a filled circle. this will create a filled circle.
----------
 this works like paintbbs's bezier tool. use it to make curves: click and drag to make an initial straight line, then drag it at two points to make a curve. this works like paintbbs's bezier tool. use it to make curves: click and drag to make an initial straight line, then drag it at two points to make a curve.
 this is a bucket tool that fills an area with color. this is a bucket tool that fills an area with color.
 copy tool. select an area, and drag it to another place on the canvas. (this works on only one layer, though.) copy tool. select an area, and drag it to another place on the canvas. (this works on only one layer, though.)

 this is the rotate tool. after selecting an area, choose the angle rotated by clicking and dragging the white line in the ANG (angle) box, and the resize of the rotated copy using the X and Y boxes. this is the rotate tool. after selecting an area, choose the angle rotated by clicking and dragging the white line in the ANG (angle) box, and the resize of the rotated copy using the X and Y boxes.
 this will flip a selected area vertically. this will flip a selected area vertically.
 this will flip a selection horizontally. this will flip a selection horizontally.
----------
 click and drag to move the entire contents of the canvas. this is a really easy way to resolve composition issues. click and drag to move the entire contents of the canvas. this is a really easy way to resolve composition issues.
 text tool click to enter in text in one of four fonts. you can also make the text bold or italic, or make the letters align vertically or horizontally. text tool click to enter in text in one of four fonts. you can also make the text bold or italic, or make the letters align vertically or horizontally.
 select an area with a rectangle--this will allow you to do one action on just that area. select an area with a rectangle--this will allow you to do one action on just that area.
 like the rectangle selection, but you can freehand the shape. like the rectangle selection, but you can freehand the shape.
 click on a colored area and the applet will select that area for you. click on a colored area and the applet will select that area for you.
 click on a colored area on the canvasto select that color as the active color. click on a colored area on the canvasto select that color as the active color.
----------
 this colors with solid color. this colors with solid color.
 this works a bit like watercolor. it's a bit softer than the solid pencil. this works a bit like watercolor. it's a bit softer than the solid pencil.
 this works like a spraypaint can... it leaves random pixels of color within its circle of size. if you move this back and forth over an area, it will fill with more and more color until it becomes solid. this works like a spraypaint can... it leaves random pixels of color within its circle of size. if you move this back and forth over an area, it will fill with more and more color until it becomes solid.
 this is the eraser. this is the eraser.
 this works like photoshop's dodge tool. it makes colors lighter. this works like photoshop's dodge tool. it makes colors lighter.
 this works like photoshop's burn tool. it makes colors darker. this works like photoshop's burn tool. it makes colors darker.
----------
 oekakibbs only allows you three levels of tones. they can be affected by the density level, though, which makes for a neat effect. oekakibbs only allows you three levels of tones. they can be affected by the density level, though, which makes for a neat effect.
 use this to smudge colors around, like fingerpainting. use this to smudge colors around, like fingerpainting.
 blurs edges and takes away some of that pixelly effect. blurs edges and takes away some of that pixelly effect.
----------
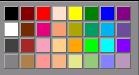 there are 32 premade colors to choose from. there are 32 premade colors to choose from.
it's best to use these colors as a guide for making your own colors, but it takes a bit of practice.
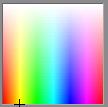 if you don't want to deal with the RBG slider, you can click and drag around in this area until you find a color you like. if you don't want to deal with the RBG slider, you can click and drag around in this area until you find a color you like.
 this control will control the lightness and darkness of a given color. this is very useful for mixing gradiations of a custom color. the higher the number, the lighter the color. this control will control the lightness and darkness of a given color. this is very useful for mixing gradiations of a custom color. the higher the number, the lighter the color.
----------

this is the rgb slider. R is red G is green and B is blue. the arrows can be used instead of clicking and dragging to make the colors. the arrows on the left change the value in increments of 10, the one on the right works in increments of 1.
----------
 undo will undo an action on the canvas. redo will undo an undo ^^ undo will undo an action on the canvas. redo will undo an undo ^^
 click here to clear the whole canvas. click here to clear the whole canvas.
----------
 also called the alpha channel. it controls things such as the transparency of a solid, watercolor or halftone, or the strength of the blur, dark, and light tools. the higher up the numbers on the opacity bar, the stronger the effect is. the lower the number, the weaker the effect. also called the alpha channel. it controls things such as the transparency of a solid, watercolor or halftone, or the strength of the blur, dark, and light tools. the higher up the numbers on the opacity bar, the stronger the effect is. the lower the number, the weaker the effect.
----------

this controls the size and shape of your brush. it also controls the width of the linerec and lineoval tools, as well as the size of the area covered by the spraypaint and eraser tools. the default setting is one by one pixel, but it can go as large as 40 by 40 pixels. also, the shape of the brush does not have to be perfectly circular. the height and width of the brush shape can be controlled by clicking and dragging in the white area, similar to using the circle tool. the white line in the black box rotates the shape of the brush.
 this is the density tool. instead of transparency, it controls how "thick" an effect is put down (like a crayon). the higher the density, the more area is covered. the lower the density, the more white space there is left, no matter how big the brush is. the area next to the density tool shows you the active color. solid, watercolor or halftone, or the effective "strength" of the blur, dark, and light tools. this is the density tool. instead of transparency, it controls how "thick" an effect is put down (like a crayon). the higher the density, the more area is covered. the lower the density, the more white space there is left, no matter how big the brush is. the area next to the density tool shows you the active color. solid, watercolor or halftone, or the effective "strength" of the blur, dark, and light tools.
----------

double click on an x to mask a color and make it so it cannot be colored over. oekakibbs allows you to maks more than one color at once. (oekakibbs assumes nothing is masked until you select a color to mask or remask.)
 click the "normal" box in mask to activate this. it works like remask in paintbbs, where only the color selected can be colored on. click the "normal" box in mask to activate this. it works like remask in paintbbs, where only the color selected can be colored on.
----------
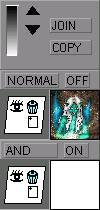
oekakibbs has greater layer controls than paintbbs.it will allow you to create many different layers. clicking on the eye will hide the selected layer, and clicking the rectangle will create a layer on top of the selected layer. clicking the trash can will delete a layer. the "join" button will layer unify the selected layer to the layer above it. the "off" button on each layer relates to the transparency. with transparency turned on, the applet will not let you color in any area that is "blank space." clicking the "normal" button will switch it to "and," which will allow a layer to show the colors of the layers beneath it (effectively making the entire layer slightly transparent.) the copy button will copy an entire layer and paste the contents on the layer below it. the triangle shaped buttons next to the copy and join buttons will allow you to change the order of your layers.
----------
 click to zoom in and out. ^___^
----------
 when you're all done, click here. a little box will pop up asking if you are sure you are complete and if you are sure you want to send (this is where you might want to recheck the rules to make sure you're okay if you're sending your picture incomplete!) if you are indeed ready to send, click ok and the image sends. assuming everything sends correctly, you will receive a confirmation message saying your picture sent. click ok. then it goes to a page that allows you to enter a title and comment. then once you are done that, click "submit" there. if you're all done with your image and don't intend to work on it later, click [mark as finished] on your picture on the main page of the room you are drawing in. There ya go, kid. You just made yourself a picture. when you're all done, click here. a little box will pop up asking if you are sure you are complete and if you are sure you want to send (this is where you might want to recheck the rules to make sure you're okay if you're sending your picture incomplete!) if you are indeed ready to send, click ok and the image sends. assuming everything sends correctly, you will receive a confirmation message saying your picture sent. click ok. then it goes to a page that allows you to enter a title and comment. then once you are done that, click "submit" there. if you're all done with your image and don't intend to work on it later, click [mark as finished] on your picture on the main page of the room you are drawing in. There ya go, kid. You just made yourself a picture.
|
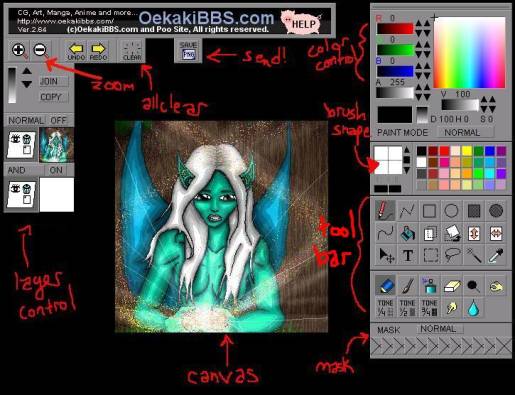 This is OekakiBBS Normal. Animated doesn't look any different; it just records your brush strokes to watch them later. The controls are grouped by function: layers, color, brush function, etc. Unlike PaintBBS, all of the tools are shown all at once; except for a very few exceptions, no tool can be clicked to reveal another tool button.
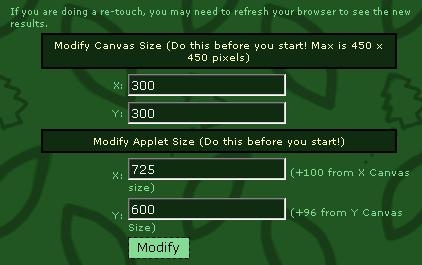 Resizing the Canvas: