
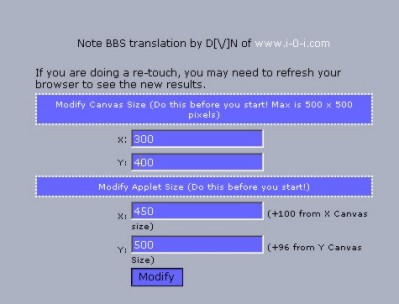
 For this tutorial, I'm using Animated PaintBBS at oekakicentral.com. I never draw in the default size (300x300), so I resize it to one I like better: 300x400. For this tutorial, I'm using Animated PaintBBS at oekakicentral.com. I never draw in the default size (300x300), so I resize it to one I like better: 300x400.
|
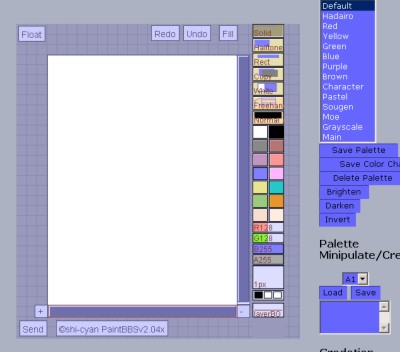 Here's the basic set-up. I rarely use a palette, but since the animation only comes with the paletted version, there they are. Here's the basic set-up. I rarely use a palette, but since the animation only comes with the paletted version, there they are.
|
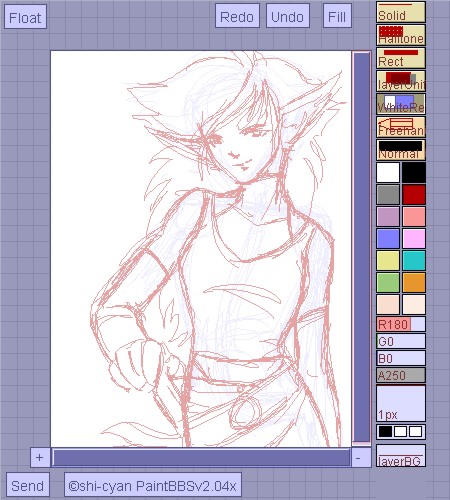
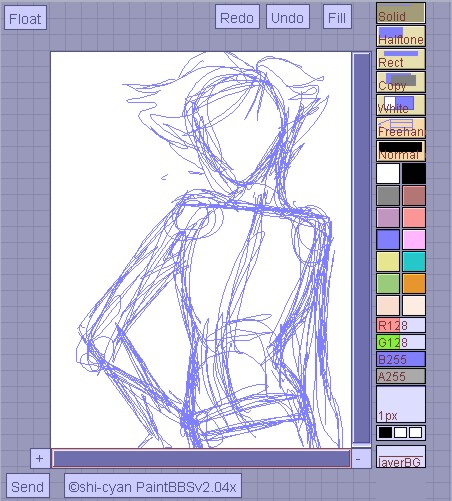 I start with a sketch on layer 0 with a 1px solid brush, usually in blue. I might go through several different sketches until I find something I like. I start with a sketch on layer 0 with a 1px solid brush, usually in blue. I might go through several different sketches until I find something I like.
|
 When I have decided on a rough pose, I use White Rectangle with the A set to 250 a couple of times to fade the first sketch, then I go over it to clean it up a bit and add things like clothes, this time using red. I might fade and resketch like this several times as well (or even just focus on one part), until I'm really happy with the sketch. When I have decided on a rough pose, I use White Rectangle with the A set to 250 a couple of times to fade the first sketch, then I go over it to clean it up a bit and add things like clothes, this time using red. I might fade and resketch like this several times as well (or even just focus on one part), until I'm really happy with the sketch.
|
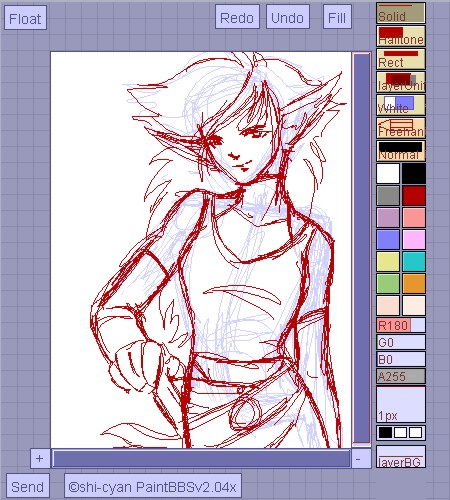
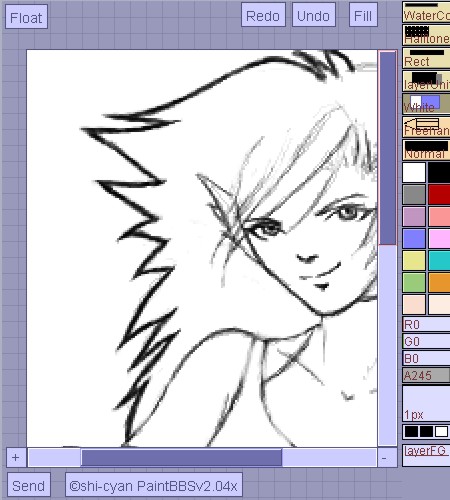
 Once I've settled on a rough sketch, I use White Rectangle again to fade the sketch so it will be easier to see my watercolor outlines. Once I've settled on a rough sketch, I use White Rectangle again to fade the sketch so it will be easier to see my watercolor outlines.
|
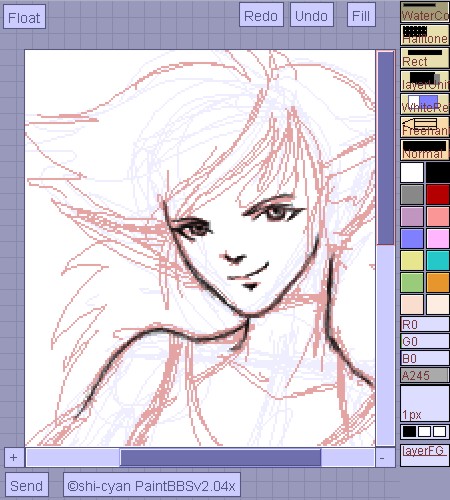 Here's my settings for the initial outlines. I like to turn the A up a bit higher than 241, because it takes all of my patience to get fairly neat lines at 245...they wind up too sketchy at 241, plus my hand gets cramps. XD For better control, I like to zoom in once. I'm not too concerned with being really precise at this point. Here's my settings for the initial outlines. I like to turn the A up a bit higher than 241, because it takes all of my patience to get fairly neat lines at 245...they wind up too sketchy at 241, plus my hand gets cramps. XD For better control, I like to zoom in once. I'm not too concerned with being really precise at this point.
|
 I've traced the sketch and can now get rid of the solid sketch. The outlines are really sketchy at this point, but I'm about to fix that (if you're really patient or have steady hands, it's possible to do nice lines right off the bat, but I tend to rush and always have to go back in and clean). I also toned her ears down quite a bit. ;) I've traced the sketch and can now get rid of the solid sketch. The outlines are really sketchy at this point, but I'm about to fix that (if you're really patient or have steady hands, it's possible to do nice lines right off the bat, but I tend to rush and always have to go back in and clean). I also toned her ears down quite a bit. ;)
|
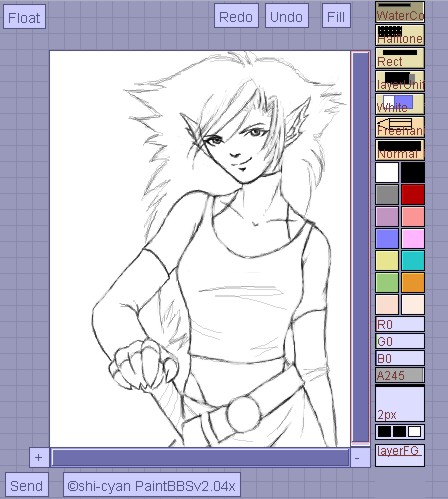 Here I've erased a lot of the sketchy dirt, which leaves most of the lines very faint. Note the settings there on the right--I use a 2px watercolor brush with an A setting of 245 to get a nice fat outer line. I use the 1px-A245 for the interior lines, and shape all of them somewhat with the eraser. (Tip: get softer edges on your eraser by turning the A down. I use 245 again--I use 245 for just about everything! ^o^) Here I've erased a lot of the sketchy dirt, which leaves most of the lines very faint. Note the settings there on the right--I use a 2px watercolor brush with an A setting of 245 to get a nice fat outer line. I use the 1px-A245 for the interior lines, and shape all of them somewhat with the eraser. (Tip: get softer edges on your eraser by turning the A down. I use 245 again--I use 245 for just about everything! ^o^)
|
 Working on the hair outline. For this part, I do want to be precise, so I zoom once and go section-by-section, outlining and cleaning at the same time. (Tip: instead of having to continually reset the A when changing the size of your brush, get your settings how you want them, then right-click on one of those little boxes right above the layer box. Now to change the brush, just click on the one you want--the brush settings have been saved!) Working on the hair outline. For this part, I do want to be precise, so I zoom once and go section-by-section, outlining and cleaning at the same time. (Tip: instead of having to continually reset the A when changing the size of your brush, get your settings how you want them, then right-click on one of those little boxes right above the layer box. Now to change the brush, just click on the one you want--the brush settings have been saved!)
|
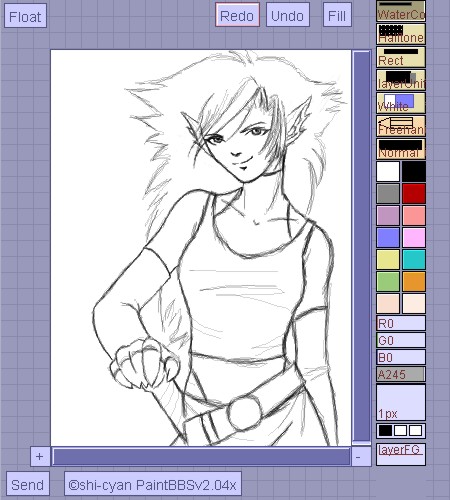
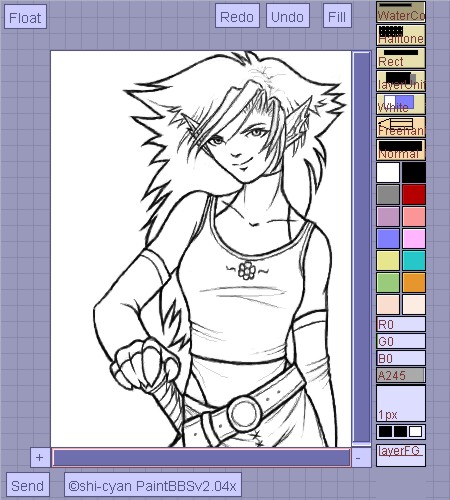 The finished outline. Adding small details like trim or laces helps to finish out the picture and gives areas that would ordinarily be fairly boring a little more interest. However, it's important to wait until the very end before you add detail--it's easy to get so caught up in detailing that you forget about the overall picture. The finished outline. Adding small details like trim or laces helps to finish out the picture and gives areas that would ordinarily be fairly boring a little more interest. However, it's important to wait until the very end before you add detail--it's easy to get so caught up in detailing that you forget about the overall picture.
|